


Hello everyone! today's article will be a walkthrough of deploying an EKS cluster of my infamous temperature calculator app (seen in previous blogs) that consists of 2 services; An API endpoint and a service that calculates the temperature and returns the response.
We'll cover everything related to provisioning an EKS Cluster from scratch and I'll try to simplify everything as much as I can. Let's get started
You'll need some basic knowledge about networking, AWS & Kubernetes, so make sure you have a good foundation before proceeding.
We'll divide the process into several steps so we can have the bigger picture at the end:
Configuring the network (VPC, Subnets, NAT, etc)
Creating the EKS Cluster (Assuming roles, creating node groups, etc)
Configuring IAM OIDC with Kubernetes Service Accounts
Installing Application Load Balancer
Adding our Kubernetes resources to the cluster
Creating a Domain name & testing everything!
Configuring the Network
I've done a walkthrough before on creating a VPC (Virtual Private Cloud) in AWS, but we'll go through it again.
First, let's create an empty directory for our terraform config files and add AWS as a provider.
# aws-provider.tf

provider "aws" {
  access_key = "my-access-key"
  secret_key = "super-secret-key"
  region = "eu-central-1"
}
You can get access & secret keys from your AWS console, more info here
Now we can start creating our network resources, let's start out with our VPC
# network.tf
resource "aws_vpc" "eks-cluster-vpc" {
  cidr_block = "10.0.0.0/16"
}
Our VPC has a CIDR block which gives us approximately 65k IP addresses per network
We'll need to also add an AWS Internet Gateway to enable this VPC to have any access to the public internet
# network.tf
resource "aws_internet_gateway" "gw" {
  vpc_id = aws_vpc.eks-cluster-vpc.id

  tags = {
    Name = "main-ig-gateway"
  }
}
Now we'll start creating our subnets. AWS EKS Requires at least 2 public subnets in different availability zones otherwise it won't work. So we'll create a total of 4 subnets 2 public and 2 private and we'll distribute them across different AZs
# network.tf
resource "aws_subnet" "private-central-1a" {
  vpc_id     = aws_vpc.eks-cluster-vpc.id
  cidr_block = "10.0.1.0/24"
  availability_zone = "eu-central-1a"

  tags = {
    Name = "eu-central-1a-private"
    "kubernetes.io/role/internal-elb" = 1
    "kubernetes.io/cluster/eks-cluster-production" = "shared"
  }
}


resource "aws_subnet" "public-central-1b" {
  vpc_id     = aws_vpc.eks-cluster-vpc.id
  cidr_block = "10.0.2.0/24"
  availability_zone = "eu-central-1b"

  tags = {
    Name = "eu-central-1b-public"
    "kubernetes.io/role/elb" = 1
    "kubernetes.io/cluster/eks-cluster-production" = "shared"
  }
}
resource "aws_subnet" "public-central-1a" {
  vpc_id     = aws_vpc.eks-cluster-vpc.id
  cidr_block = "10.0.3.0/24"
  availability_zone = "eu-central-1a"

  tags = {
    Name = "eu-central-1a-public"
    "kubernetes.io/role/elb" = 1
    "kubernetes.io/cluster/eks-cluster-production" = "shared"
  }
}
resource "aws_subnet" "private-central-1b" {
  vpc_id     = aws_vpc.eks-cluster-vpc.id
  cidr_block = "10.0.4.0/24"
  availability_zone = "eu-central-1b"

  tags = {
    Name = "eu-central-1b-private"
    "kubernetes.io/role/internal-elb" = 1
    "kubernetes.io/cluster/eks-cluster-production" = "shared"
  }
}
This might not have any terraform magic in it (simple plain code) and there are ways to make this much smaller but for the sake of the article I'll keep it raw.
Each subnet has its own CIDR block and availability zone. We created a private and public subnet on each AZ.
Also, we added these tags for the private subnets as per AWS EKS Documentation
"kubernetes.io/role/internal-elb" = 1
"kubernetes.io/cluster/eks-cluster-production" = "shared"
These tags help out with subnet auto-discovery when installing the Application Load Balancer at the end it auto-discovers all the cluster subnets using these tags.
Setting "kubernetes.io/role/internal-elb" = 1 states that the subnet has a private load balancer and is not exposed to the internet.
Setting the "kubernetes.io/cluster/eks-cluster-production" = "shared" means that this subnet can be used by other AWS resources other than EKS (RDS for example), if it was only used by EKS we can set it to owned
As for public subnets, we add "kubernetes.io/role/elb" = 1 Which states that load balancing in them can and will be exposed to the public internet.
For private subnets, as of right now they are unable to access the public internet which can lead to a problem (can't install any updates, pull any images from docker hub for example, etc) we will provision a NAT Gateway that our private subnets can use to access the internet.
# NAT.tf
resource "aws_eip" "nat-ip" {
  vpc      = true
}
resource "aws_nat_gateway" "my-nat-gateway" {
  allocation_id = aws_eip.nat-ip.id
  subnet_id     = aws_subnet.public-central-1b.id

  tags = {
    Name = "gw NAT"
  }

  depends_on = [aws_internet_gateway.gw]
}
The NAT Gateway requires the VPC to have an Internet Gateway and takes in a subnet where the gateway should reside and an Elastic IP which gives us a public static IP Address for the Gateway.
So Far we created 4 subnets 2 of them being private and 2 public, but so far it's only just naming and we haven't done anything to make sure that one is private and the other is public, We'll now start by creating route tables that decide where and how to route the packets from the subnets.
# route-tables.tf
resource "aws_route_table" "private-routing-table" {
  vpc_id = aws_vpc.eks-cluster-vpc.id

  route {
    cidr_block = "0.0.0.0/0"
    nat_gateway_id = aws_nat_gateway.my-nat-gateway.id
  }
}

resource "aws_route_table" "public-routing-table" {
  vpc_id = aws_vpc.eks-cluster-vpc.id

  route {
    cidr_block = "0.0.0.0/0"
    gateway_id = aws_internet_gateway.gw.id
  }
}

resource "aws_route_table_association" "private-association" {
  subnet_id      = aws_subnet.private-central-1a.id
  route_table_id = aws_route_table.private-routing-table.id
}

resource "aws_route_table_association" "public-association" {
  subnet_id      = aws_subnet.public-central-1b.id
  route_table_id = aws_route_table.public-routing-table.id
}

resource "aws_route_table_association" "private-association2" {
  subnet_id      = aws_subnet.private-central-1b.id
  route_table_id = aws_route_table.private-routing-table.id
}

resource "aws_route_table_association" "public-association2" {
  subnet_id      = aws_subnet.public-central-1a.id
  route_table_id = aws_route_table.public-routing-table.id
}
What we did was provision 2 routing tables and give them each the same CIDR block 0.0.0.0/0 which means any IPV4 Addresses get routed to the Internet Gateway in public subnets and the NAT Gateway in private ones. Then we proceeded to bind them to subnets using aws_route_table_association
Recap: What we did so far was provision a VPC along with an Internet Gateway, a NAT Gateway and 4 subnets and then proceeded to bind the routing tables for public and private subnets respectively
Creating the EKS Cluster
Now comes the fun part 🤡. Before continuing we'll need to talk a bit about AWS IAM Roles and what assuming roles means because we're going to need this information moving forward.
One of the many items on the list of AWS security best practices is to use roles to grant limited access to certain resources for a limited period.
Now in IAM, there exists what we call Principals, these are entities who can make calls to AWS APIs and can be anything from a human being to an AWS Service.
Roles also can be considered principles, once a user assumes a certain role he can have access to all the policies that belong to that role.
A role has the primary purpose of granting temporary permissions to perform API calls in an account. To use a role, it has to be assumed.
A policy allows or denies a set of actions to a principal on certain resources.
There are 2 types of policies, Identity and resource-based policy
Identity-based policies can be attached to all identities and resource-based policies belong to resources. They’re very similar in what they do, but there are a few key differences; an identity-based policy answers the question “Which API calls can this identity perform on which resources?” whereas a resource-based policy answers the question: “Which identities can perform which actions on me?”.
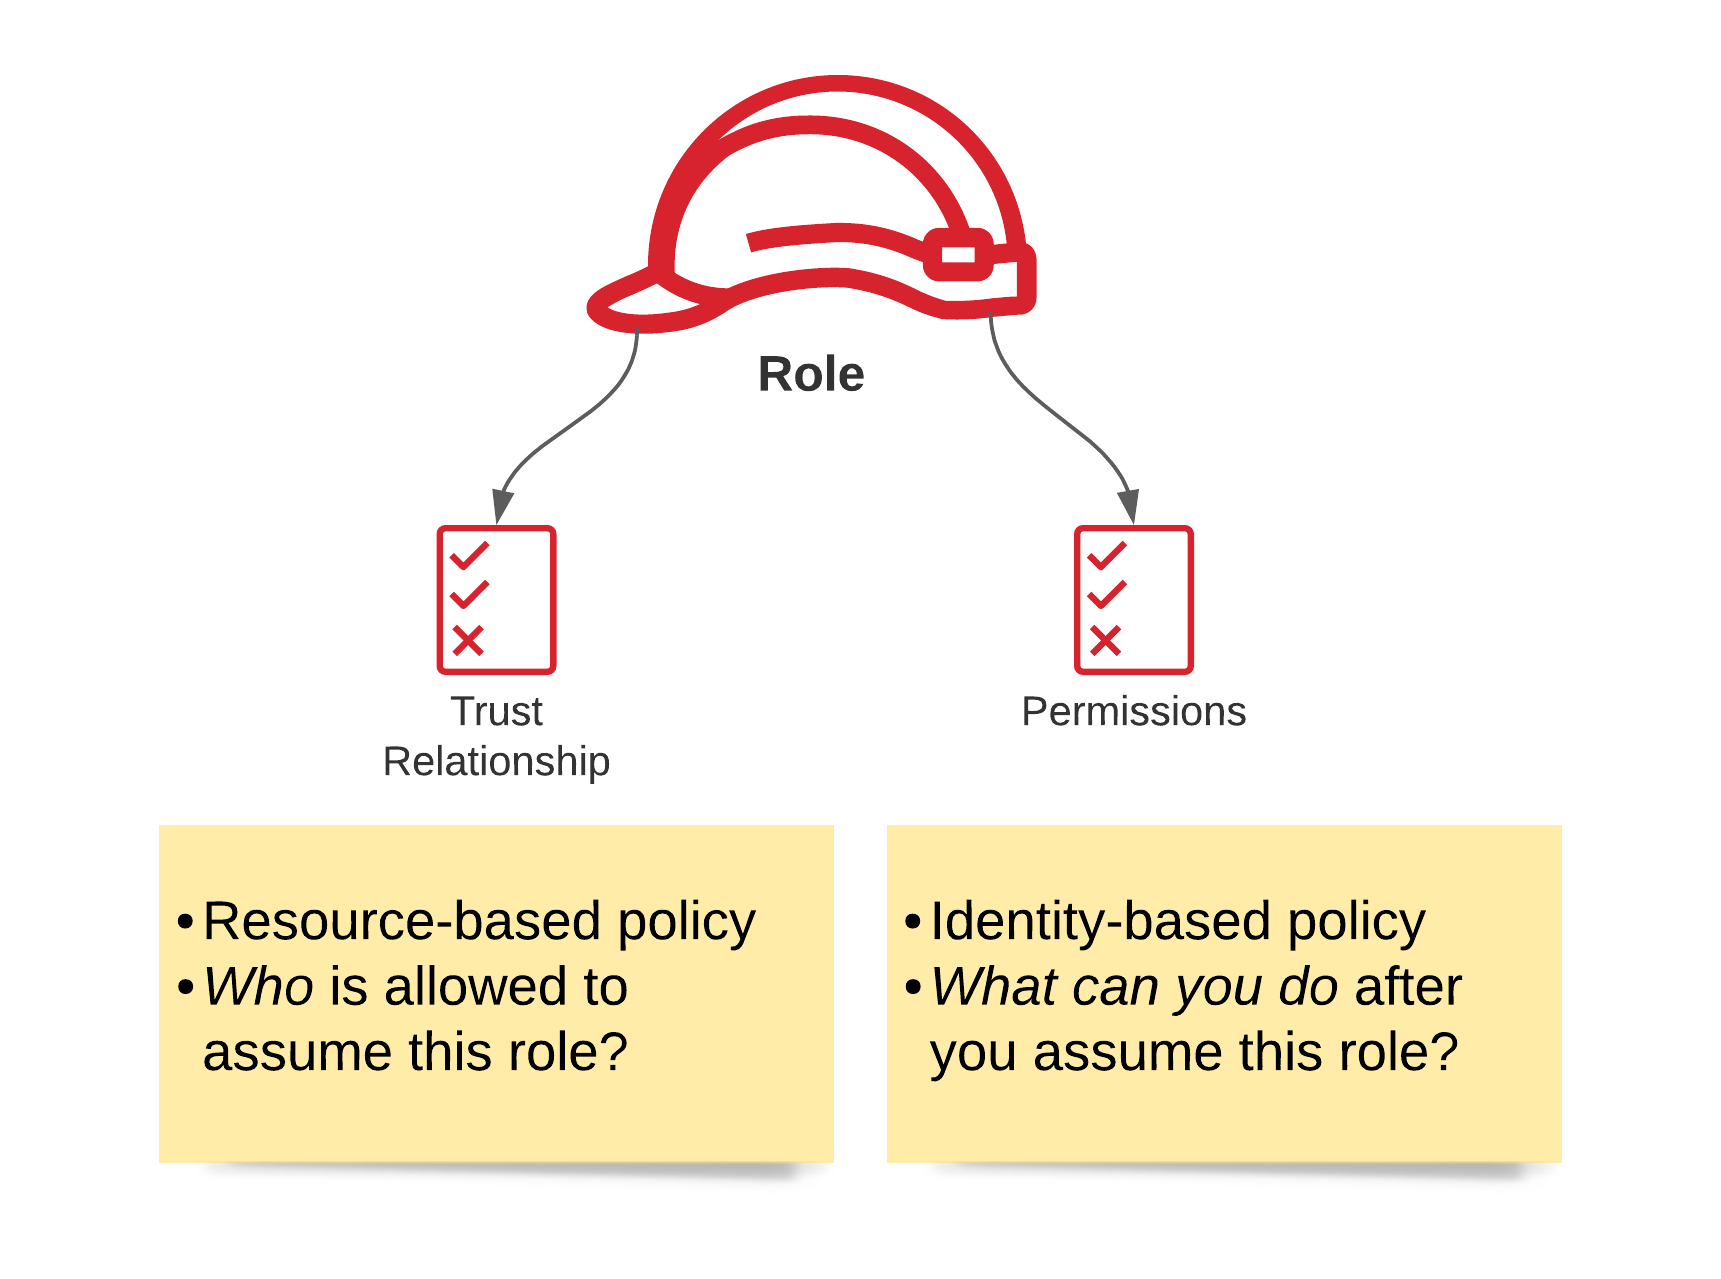
Each role has a trust relationship which determines the entities that can assume the role. It also has a set of permissions that define which privileges entities get after they assume the role.
When we want to assume a role, we need to make an API Call to AWS Security Token Service (STS) using the sts:AssumeRole Action. It will only provide us with valid temporary credentials when the following cases succeed:
A permission to actually call
sts:AssumeRoleexists in the identity policyThe principal who wants to assume the role is listed in the trust relationship of the role.
On success the principal is granted a security token which he can make the API Call for the requested resource.
Why did we have to know this you might ask? Well the EKS cluster in our case can be considered a principal, the cluster needs to assume a certain role so it can make API Calls to required AWS Resources for it to build & work properly.
Let's continue building EKS
# EKS.tf
data "aws_iam_policy_document" "assume_role" {
  statement {
    effect = "Allow"
    principals {
      type        = "Service"
      identifiers = ["eks.amazonaws.com"]
    }

    actions = ["sts:AssumeRole"]
  }
}

resource "aws_iam_role" "eks-role" {
  name               = "eks-cluster-example"
  assume_role_policy = data.aws_iam_policy_document.assume_role.json
}

resource "aws_iam_role_policy_attachment" "example-AmazonEKSClusterPolicy" {
  policy_arn = "arn:aws:iam::aws:policy/AmazonEKSClusterPolicy"
  role       = aws_iam_role.eks-role.name
}
What we did above was create the policy document which is basically our trust relationship as explained above, we allow it to make an API Call to sts:AssumeRole and only the eks service has the abillity to assume this role.
Then we proceed to create the actual role and bind the trust relationship to it.
After that we created a policy that attaches the role created to arn:aws:iam::aws:policy/AmazonEKSClusterPolicy.
So when a principal assumes this role he has access to anything governed inside arn:aws:iam::aws:policy/AmazonEKSClusterPolicy
# EKS.tf
resource "aws_eks_cluster" "prod-eks-cluster" {
  name     = "eks-cluster-production"
  role_arn = aws_iam_role.eks-role.arn

  vpc_config {
    subnet_ids = [aws_subnet.private-central-1a.id, aws_subnet.public-central-1b.id, aws_subnet.private-central-1b.id, aws_subnet.public-central-1a.id]
  }

  depends_on = [
    aws_iam_role_policy_attachment.example-AmazonEKSClusterPolicy
  ]
}
Finally the EKS cluster which takes in the arn (Amazon Resource Name) of the role created, an array of all the subnets we wanta this cluster to have and a depends on policy which makes sure that the policy gets created & attached to the role first before the EKS cluster.
Now we'll need to create the workers of cluster. Node groups are the underlying nodes that the cluster uses.
Node groups require us to assume roles to it aswell since it makes underlying calls to different AWS resources.
# Node-groups.tf
resource "aws_iam_role" "ng-example" {
  name = "eks-node-group-example"

  assume_role_policy = jsonencode({
    Statement = [{
      Action = "sts:AssumeRole"
      Effect = "Allow"
      Principal = {
        Service = "ec2.amazonaws.com"
      }
    }]
    Version = "2012-10-17"
  })
}

resource "aws_iam_role_policy_attachment" "example-AmazonEKSWorkerNodePolicy" {
# Allows them to connect to EKS clusters
  policy_arn = "arn:aws:iam::aws:policy/AmazonEKSWorkerNodePolicy"
  role       = aws_iam_role.ng-example.name
}

resource "aws_iam_role_policy_attachment" "example-AmazonEKS_CNI_Policy" {
# Service that Adds IP addresses to kubernetes nodes
  policy_arn = "arn:aws:iam::aws:policy/AmazonEKS_CNI_Policy"
  role       = aws_iam_role.ng-example.name
}

resource "aws_iam_role_policy_attachment" "example-AmazonEC2ContainerRegistryReadOnly" {
# ECR for images if exists
  policy_arn = "arn:aws:iam::aws:policy/AmazonEC2ContainerRegistryReadOnly"
  role       = aws_iam_role.ng-example.name
}
Here we created a iam role and used the jsonencode function instead of creating an aws_iam_policy_document which was what we did in the eks role.
We allowed the call to sts:AssumeRole where the principal has to be the EC2 service.
Then we attached a couple of policies required by node groups to correctly start as per AWS Documentation.
# Node-groups.tf
resource "aws_eks_node_group" "prod-eks-node-group" {
  cluster_name    = aws_eks_cluster.prod-eks-cluster.name
  node_group_name = "prod-group"
  node_role_arn   = aws_iam_role.ng-example.arn
  subnet_ids      = [aws_subnet.private-central-1a.id, aws_subnet.private-central-1b.id]

  scaling_config {
    desired_size = 3
    max_size     = 4
    min_size     = 1
  }

  update_config {
    max_unavailable = 1
  }

  capacity_type = "ON_DEMAND"
  instance_types = ["t3.micro"]
  depends_on = [
    aws_iam_role_policy_attachment.example-AmazonEKSWorkerNodePolicy,
    aws_iam_role_policy_attachment.example-AmazonEKS_CNI_Policy,
    aws_iam_role_policy_attachment.example-AmazonEC2ContainerRegistryReadOnly,
  ]
}
Here we configure the node group, give it the EKS cluster name, the role ARN and the subnets i want my nodes to be provisioned in.
Giving it a desired size of 3 nodes with a max_size of 4. Max size won't work unless we use auto scaler which won't be covered today but in the future.
Then the capacity type and instance types; i chose the cheapest option for demo purposes. Finally a depends on block that waits for the policies to get attached to the role before creating the node group.
Configuring IAM OIDC with Kubernetes Service Accounts
Before moving forward to our last stop which is creating the Kubernetes Services & AWS Load Balancer Controller. It's a good practice to implement IAM OpenID Connect and allow Kubernetes Service Accounts to integrate with it.
IRSA (IAM Roles for service accounts) is the AWS EKS way to allow applications running in EKS pods to access AWS API, using permissions configured in AWS IAM roles. It’s an improvement over the previous architecture of applications running in pods to use the IAM roles of the underlying EKS nodes.The problem here is that all pods running on the Kubernetes node share the same set of permissions and this can cause a violation of the least privilege principle.
# oidc.tf
data "tls_certificate" "eks"{
 url = aws_eks_cluster.prod-eks-cluster.identity[0].oidc[0].issuer
}
resource "aws_iam_openid_connect_provider" "eks" {
  url = aws_eks_cluster.prod-eks-cluster.identity[0].oidc[0].issuer

  client_id_list = [
    "sts.amazonaws.com"
  ]

  thumbprint_list = [data.tls_certificate.eks.certificates[0].sha1_fingerprint]
}
In this block of code we created an OIDC provider using the issuer url that EKS Automatically creates for us. We specified sts as a client for this provider and gave a thumbprint_list which is basically a fingerprint used in digital signatures.
Installing AWS Application Load Balancer
In order to install ALB so we can expose the services we want to the internet and give it the ALB fault tolerance and availability we need, we'll install it's helm chart. But first we need to add a new provider to our terraform config.
provider "helm" {
  kubernetes {
    host                   = aws_eks_cluster.prod-eks-cluster.endpoint
    cluster_ca_certificate = base64decode(aws_eks_cluster.prod-eks-cluster.certificate_authority[0].data)
    exec {
      api_version = "client.authentication.k8s.io/v1beta1"
      args        = ["eks", "get-token", "--cluster-name", aws_eks_cluster.prod-eks-cluster.name]
      command     = "aws"
    }
  }
}
We install helm passing in the eks endpoint & certificate along with an exec block that assures that the helm provider always gets a valid token when doing anything related to our cluster.
Before proceeding to the actual chart installation, we'll need to create a role for ALB with a trust policy and permissions, just like we did at the start with EKS and node groups
# LB-role.tf
resource "aws_iam_policy" "ingress" {
  name        = "AWSLoadBalancerControllerIAMPolicy"
  description = "AWS Load Balancer Controller IAM Policy"
  policy    = jsonencode(
  {
    "Version": "2012-10-17",
    "Statement": [
        {
            "Effect": "Allow",
            "Action": [
                "iam:CreateServiceLinkedRole"
            ],
            "Resource": "*",
            "Condition": {
                "StringEquals": {
                    "iam:AWSServiceName": "elasticloadbalancing.amazonaws.com"
                }
            }
        },
        {
            "Effect": "Allow",
            "Action": [
                "ec2:DescribeAccountAttributes",
                "ec2:DescribeAddresses",
                "ec2:DescribeAvailabilityZones",
                "ec2:DescribeInternetGateways",
                "ec2:DescribeVpcs",
                "ec2:DescribeVpcPeeringConnections",
                "ec2:DescribeSubnets",
                "ec2:DescribeSecurityGroups",
                "ec2:DescribeInstances",
                "ec2:DescribeNetworkInterfaces",
                "ec2:DescribeTags",
                "ec2:GetCoipPoolUsage",
                "ec2:DescribeCoipPools",
                "elasticloadbalancing:DescribeLoadBalancers",
                "elasticloadbalancing:DescribeLoadBalancerAttributes",
                "elasticloadbalancing:DescribeListeners",
                "elasticloadbalancing:DescribeListenerCertificates",
                "elasticloadbalancing:DescribeSSLPolicies",
                "elasticloadbalancing:DescribeRules",
                "elasticloadbalancing:DescribeTargetGroups",
                "elasticloadbalancing:DescribeTargetGroupAttributes",
                "elasticloadbalancing:DescribeTargetHealth",
                "elasticloadbalancing:DescribeTags"
            ],
            "Resource": "*"
        },
        {
            "Effect": "Allow",
            "Action": [
                "cognito-idp:DescribeUserPoolClient",
                "acm:ListCertificates",
                "acm:DescribeCertificate",
                "iam:ListServerCertificates",
                "iam:GetServerCertificate",
                "waf-regional:GetWebACL",
                "waf-regional:GetWebACLForResource",
                "waf-regional:AssociateWebACL",
                "waf-regional:DisassociateWebACL",
                "wafv2:GetWebACL",
                "wafv2:GetWebACLForResource",
                "wafv2:AssociateWebACL",
                "wafv2:DisassociateWebACL",
                "shield:GetSubscriptionState",
                "shield:DescribeProtection",
                "shield:CreateProtection",
                "shield:DeleteProtection"
            ],
            "Resource": "*"
        },
        {
            "Effect": "Allow",
            "Action": [
                "ec2:AuthorizeSecurityGroupIngress",
                "ec2:RevokeSecurityGroupIngress"
            ],
            "Resource": "*"
        },
        {
            "Effect": "Allow",
            "Action": [
                "ec2:CreateSecurityGroup"
            ],
            "Resource": "*"
        },
        {
            "Effect": "Allow",
            "Action": [
                "ec2:CreateTags"
            ],
            "Resource": "arn:aws:ec2:*:*:security-group/*",
            "Condition": {
                "StringEquals": {
                    "ec2:CreateAction": "CreateSecurityGroup"
                },
                "Null": {
                    "aws:RequestTag/elbv2.k8s.aws/cluster": "false"
                }
            }
        },
        {
            "Effect": "Allow",
            "Action": [
                "ec2:CreateTags",
                "ec2:DeleteTags"
            ],
            "Resource": "arn:aws:ec2:*:*:security-group/*",
            "Condition": {
                "Null": {
                    "aws:RequestTag/elbv2.k8s.aws/cluster": "true",
                    "aws:ResourceTag/elbv2.k8s.aws/cluster": "false"
                }
            }
        },
        {
            "Effect": "Allow",
            "Action": [
                "ec2:AuthorizeSecurityGroupIngress",
                "ec2:RevokeSecurityGroupIngress",
                "ec2:DeleteSecurityGroup"
            ],
            "Resource": "*",
            "Condition": {
                "Null": {
                    "aws:ResourceTag/elbv2.k8s.aws/cluster": "false"
                }
            }
        },
        {
            "Effect": "Allow",
            "Action": [
                "elasticloadbalancing:CreateLoadBalancer",
                "elasticloadbalancing:CreateTargetGroup"
            ],
            "Resource": "*",
            "Condition": {
                "Null": {
                    "aws:RequestTag/elbv2.k8s.aws/cluster": "false"
                }
            }
        },
        {
            "Effect": "Allow",
            "Action": [
                "elasticloadbalancing:CreateListener",
                "elasticloadbalancing:DeleteListener",
                "elasticloadbalancing:CreateRule",
                "elasticloadbalancing:DeleteRule"
            ],
            "Resource": "*"
        },
        {
            "Effect": "Allow",
            "Action": [
                "elasticloadbalancing:AddTags",
                "elasticloadbalancing:RemoveTags"
            ],
            "Resource": [
                "arn:aws:elasticloadbalancing:*:*:targetgroup/*/*",
                "arn:aws:elasticloadbalancing:*:*:loadbalancer/net/*/*",
                "arn:aws:elasticloadbalancing:*:*:loadbalancer/app/*/*"
            ],
            "Condition": {
                "Null": {
                    "aws:RequestTag/elbv2.k8s.aws/cluster": "true",
                    "aws:ResourceTag/elbv2.k8s.aws/cluster": "false"
                }
            }
        },
        {
            "Effect": "Allow",
            "Action": [
                "elasticloadbalancing:AddTags",
                "elasticloadbalancing:RemoveTags"
            ],
            "Resource": [
                "arn:aws:elasticloadbalancing:*:*:listener/net/*/*/*",
                "arn:aws:elasticloadbalancing:*:*:listener/app/*/*/*",
                "arn:aws:elasticloadbalancing:*:*:listener-rule/net/*/*/*",
                "arn:aws:elasticloadbalancing:*:*:listener-rule/app/*/*/*"
            ]
        },
        {
            "Effect": "Allow",
            "Action": [
                "elasticloadbalancing:AddTags"
            ],
            "Resource": [
                "arn:aws:elasticloadbalancing:*:*:targetgroup/*/*",
                "arn:aws:elasticloadbalancing:*:*:loadbalancer/net/*/*",
                "arn:aws:elasticloadbalancing:*:*:loadbalancer/app/*/*"
            ],
            "Condition": {
                "StringEquals": {
                    "elasticloadbalancing:CreateAction": [
                        "CreateTargetGroup",
                        "CreateLoadBalancer"
                    ]
                },
                "Null": {
                    "aws:RequestTag/elbv2.k8s.aws/cluster": "false"
                }
            }
        },
        {
            "Effect": "Allow",
            "Action": [
                "elasticloadbalancing:ModifyLoadBalancerAttributes",
                "elasticloadbalancing:SetIpAddressType",
                "elasticloadbalancing:SetSecurityGroups",
                "elasticloadbalancing:SetSubnets",
                "elasticloadbalancing:DeleteLoadBalancer",
                "elasticloadbalancing:ModifyTargetGroup",
                "elasticloadbalancing:ModifyTargetGroupAttributes",
                "elasticloadbalancing:DeleteTargetGroup"
            ],
            "Resource": "*",
            "Condition": {
                "Null": {
                    "aws:ResourceTag/elbv2.k8s.aws/cluster": "false"
                }
            }
        },
        {
            "Effect": "Allow",
            "Action": [
                "elasticloadbalancing:RegisterTargets",
                "elasticloadbalancing:DeregisterTargets"
            ],
            "Resource": "arn:aws:elasticloadbalancing:*:*:targetgroup/*/*"
        },
        {
            "Effect": "Allow",
            "Action": [
                "elasticloadbalancing:SetWebAcl",
                "elasticloadbalancing:ModifyListener",
                "elasticloadbalancing:AddListenerCertificates",
                "elasticloadbalancing:RemoveListenerCertificates",
                "elasticloadbalancing:ModifyRule"
            ],
            "Resource": "*"
        }
    ]
})
}
We first created a policy from scratch, gave it a name and several statement blocks covering all the permissions required.
# LB-role.tf
data "aws_iam_policy_document" "ingress-iam" {
  statement {
    actions = ["sts:AssumeRoleWithWebIdentity"]
    effect = "Allow"

    condition {
      test ="StringEquals"
      variable = "${replace(aws_iam_openid_connect_provider.eks.url, "https://", "")}:sub"
      values = ["system:serviceaccount:kube-system:aws-load-balancer-controller"]
    }
    principals {
      type        = "Federated"
      identifiers = [aws_iam_openid_connect_provider.eks.arn]
    }
  }
}
Now this is our trust relationship document, allowing this time access to call the sts:AssumeRoleWithWebIdentity since we're using OIDC. With a principal of only the eks service and with a special condition of matching strings. It makes sure that the value system:serviceaccount:kube-system:aws-load-balancer-controller exists as a :sub in the Service Account token sent along with the request. sub means the principal in our case the service account of aws-load-balancer-controller in the kube-system namespace.
# LB-role.tf
resource "aws_iam_role" "ingress-role" {
  name = "test-ingress"
  assume_role_policy = data.aws_iam_policy_document.ingress-iam.json
}

resource "aws_iam_role_policy_attachment" "ingress" {
  role = aws_iam_role.ingress-role.name
  policy_arn = aws_iam_policy.ingress.arn
}
Now all we do is create the role, bind it with the trust relationship and the policy we created earlier.
Moving on now we create the helm chart for ALB
resource "helm_release" "aws_load_balancer_controller"{
  name = "aws-load-balancer-controller"
  repository = "https://aws.github.io/eks-charts"
  chart = "aws-load-balancer-controller"
  namespace = "kube-system"

  set {
    name = "replicaCount"
    value = 1
  }

  set{
    name = "clusterName"
    value = aws_eks_cluster.prod-eks-cluster.name
  }

  set{
    name="vpcId"
    value = aws_vpc.eks-cluster-vpc.id
  }

  set{
    name = "serviceAccount.name"
    value= "aws-load-balancer-controller"
  }

  set{
    name= "serviceAccount.annotations.eks\\.amazonaws\\.com/role-arn"
    value = aws_iam_role.ingress-role.arn
  }
}
We create the helm chart and set a couple of configs that are important.
Cluster Name which will match our eks cluster name
VPC ID which is optional
Service Account name which is important and will be the name of our ALB Service account
Annotations on the service account describing that it can assume the IAM role we just created.
Now everything should be set up, apply the following and let terraform do its magic.
terraform init
terraform apply --auto-approve
This usually takes 10 minutes or so to fully build.
Moving on you'll need to have kubectl installed to be able to apply all the service
Once finished, run the following to update your kube-config
aws eks --region eu-central-1 update-kubeconfig --name eks-cluster-production
Then set the default kubectl context to be your new EKS cluster
kubectl config viewThen find the name of the new clusterkubectl config set-context <name>
Create a separate namespace for the services below
kubectl create namespace temp-calculator
Now you can apply all the services & deployments below using kubectl apply -f <file-name>.yaml
api-deployment.yaml
apiVersion: v1
kind: ServiceAccount
metadata:
  name: aws-sa
  namespace: temp-calculator
  annotations:
    eks.amazonaws.com/role-arn: arn:aws:iam::383567628073:role/test-oidc
---
apiVersion: apps/v1
kind: Deployment
metadata:
  name: temperature-api
  namespace: temp-calculator
spec:
  replicas: 1
  selector:
    matchLabels:
      app: temperature-api
  template:
    metadata:
      labels:
        app: temperature-api
    spec:
      serviceAccountName: aws-sa
      containers:
      - name: temperature-api
        image: amrelhewy/temperature-api:2.0
        resources:
          limits:
            memory: "90Mi"
            cpu: "250m"
        ports:
        - containerPort: 3000
---
apiVersion: v1
kind: Service
metadata:
  name: temperature-api
  namespace: temp-calculator
spec:
  selector:
    app: temperature-api
  ports:
  - port: 3000
    name: http
temp-service-deployment.yaml
apiVersion: apps/v1
kind: Deployment
metadata:
  name: temperature-service
  namespace: temp-calculator
spec:
  replicas: 1
  selector:
    matchLabels:
      app: temperature-service
  template:
    metadata:
      labels:
        app: temperature-service
    spec:
      containers:
      - name: temperature-service
        image: amrelhewy/temperature-service:2.0
        imagePullPolicy: IfNotPresent
        resources:
          limits:
            memory: "90Mi"
            cpu: "250m"
        ports:
        - containerPort: 8080
---
apiVersion: v1
kind: Service
metadata:
  name: temperature-service
  namespace: temp-calculator
spec:
  selector:
    app: temperature-service
  ports:
  - port: 8080
Finally our ingress
ingress.yaml
apiVersion: networking.k8s.io/v1
kind: Ingress
metadata:
  name: k8s-alb
  namespace: temp-calculator
  labels:
    name: k8s-alb
  annotations:
    alb.ingress.kubernetes.io/scheme: internet-facing
    alb.ingress.kubernetes.io/target-type: ip
spec:
  ingressClassName: alb
  rules:
  - host: <your-domain>
    http:
      paths:
      - pathType: Prefix
        path: "/"
        backend:
          service:
            name: temperature-api
            port:
              number: 3000
The Ingress uses the underlying ALB as the ingress controller, we annotate it with a couple of annotations as per AWS Documentation.
Finally if you have an existing domain, when you do kubectl get ingress -n temp-calculator you can see the Address for the ingress AWS provides us. All you need to do is add a CNAME record for your domain and point it to that value. If you have any questions feel free to reach me on Linkedin or Twitter! both linked in my profile
To Test the API just send a curl request as follows
curl -X GET "http://<domain>?from=Celsius&to=Kelvin&temperature=36"

# response
# {"value":309.15,"unit":"Kelvin"}
That wraps it up for April's article, if you have any questions make sure to reach out via Linkedin or Twitter (both in my bio). See you next month 🚀
Note: Make sure to do terraform destroy after you finish! as EKS costs 0.10$ per hour 😅