


Hello everyone in this article I'm going to be talking about caches in distributed systems and doing a hands on deploying a sharded memcache across multiple nodes in a Kubernetes cluster. Before we get started if you wish to code along you'll need to have Kubernetes installed on your device and you'll need a local cluster running and to be able to do that check out minikube and follow the steps to install it and you'll have a local cluster running in no time.
Main goal of the article
The main goal in this article is to add some sort of availability to our cluster which will consist simply of a go app that has an endpoint which when we call with a query param it will cache that param as a key with a random value in one of the shards and always hit the same shard retrieving the value if it exists.
Why sharded caches
Sharding in general is most probably a solution when you have data that a single machine can't hold alone so you begin to split up the data amongst several machines. In our example we'll assume that there are many users hitting the endpoint to a point where the cache is too much to handle for a single node memory. So we thought of a solution and it was to shard the cache among several nodes and have a sharding key which routes each request to its shard respectively.
Wait what even is a sharding key?
A sharding key is an identifier that routes certain requests to certain shards, for example let's say that we have 2 shards one in Europe and the other in NA and based on the geographical location of the user requesting we route them to the nearest shard. This is the responsibility of the sharding function which takes in for example the country the request originated from and routes that address to its shard. The sharding function is similar to that in the hash table data structure which takes a key and maps it to the value of that key. Usually you get a value from the sharding function and use the modulu % operator over the number of shards you have. That guarantees that a certain request will always get routed to the same shard. The only thing that might change this is if you scale up or down your shards for example add extra nodes.
Scaling up or down the shards would re route to different nodes
As the value of the modulu would change it might re route to different shards effectively reducing the hit rate of the cache. But Consistent Hashing exists for this reason which aims to minimize the number of rerouted requests, it is very well explained in this article here
Now that that's out of the way let's look at a simple Kubernetes cluster that consists of the following:
- A Golang web server with an endpoint that simply takes a query param and adds it as a key in the cache
- Twemproxy which is an open source tool developed by Twitter and automatically shards data between multiple shard servers and uses consistent hashing under the hood.
- Memcached which is an in memory caching system
First of all we create a Deployment file in Kubernetes name it deployment.yml for our Go app as follows:
apiVersion: apps/v1
kind: Deployment
metadata:
  name: goapp
spec:
  replicas: 3
  selector:
    matchLabels:
      app: goapp
  template:
    metadata:
      labels:
        app: goapp
    spec:
      containers:
      - name: goapp
        image: amrelhewy/kubeapp:4.151
        resources:
          limits:
            memory: "400Mi"
            cpu: "200m"
        ports:
        - containerPort: 3000
To apply the above configuration just type
kubectl create -f deployment.yml
The snippet above will create 3 replicas of our Go app distributed across our Kubernetes cluster nodes. Also the reason I have the cpu and memory this low is because I deployed an actual cluster on digital ocean and was struggling with the poor nodes I had :D
Now creating a service go_service.yml for the deployment above which also can act as a LoadBalancer
apiVersion: v1
kind: Service
metadata:
  name: k8s-go-svc
spec:
  type: LoadBalancer
  selector:
    app: goapp
  ports:
  - name: http
    port: 80
    targetPort: 3000
Apply with
kubectl create -f go_service.yml
This creates a service for our deployment of type LoadBalancer, services allow us to get DNS names for each pod along with a DNS name that resolves to one of the pods via load balancing. But to access it from outside the cluster either connect to the external ip that the service will have and to get that just do
kubectl get svc -o wide
- -o stands for output. And take the external ip along with the port(we'll do that later on)
Or if you're local using Minikube you can use port forwarding to connect. All you have to do in our example is
kubectl port-forward svc/k8s-go-svc 3000:80
And access it using localhost:3000
However we are not done yet! we let's move on to deploying memcached, to do so we use a StatefulSet alongside with a Kubernetes Headless Service
memcached.yml
apiVersion: apps/v1
kind: StatefulSet
metadata:
  name: sharded-memcache
spec:
  selector:
    matchLabels:
      app: sharded-memcache
  serviceName: "memcache"
  replicas: 3
  template:
    metadata:
      labels:
        app: sharded-memcache
    spec:
      containers:
      - name: memcache
        image: memcached
        ports:
        - containerPort: 11211
Apply using:
kubectl create -f memcached.yml
This would create 3 replicas for our sharded memcache. The serviceName added is important as when we use the headless service it has to be the same name for it to work. Because each pod in the memcache stateful set gets a certain DNS name that has the pattern of .:port
The service is as follows:
memcache-svc.yml
apiVersion: v1
kind: Service
metadata:
  name: memcache
spec:
  clusterIP: None
  selector:
    app: sharded-memcache
Apply using:
kubectl create -f memcache-svc.yml
The clusterIP:None ensures that the service will be headless and won't have any internal/external cluster IPs After applying the service we should have 3 DNS names for each of our memcache replicas as follows sharded-memcache-0.memcache:11211 sharded-memcache-1.memcache:11211 sharded-memcache-2.memcache:11211
These 3 are accessibly from inside the cluster and all that's left is installing twemproxy and connecting everything together.
*I'm aware I didn't map the volumes for any snapshotting and if the nodes restart or fail the data would be gone, it's just for demo purposes
Before we go further we need to have some configurations for twemproxy that are ready when it loads - we need to provide it with the 3 DNS's above and let it know we are sharding memcache not Redis for example. To do so we create a Kubernetes ConfigMap which allow us to store config files and such. The configuration is as follows:
twem-config.yml
memcached:
  listen: 0.0.0.0:11211
  hash: fnv1a_64
  distribution: ketama
  auto_eject_hosts: true
  timeout: 400
  server_retry_timeout: 2000
  server_failure_limit: 1
  servers:
   - sharded-memcache-0.memcache:11211:1
   - sharded-memcache-1.memcache:11211:1
   - sharded-memcache-2.memcache:11211:1
The twemproxy server will listen on port 11211, the hash and distribution are recommended by twemproxy as they are the hashing algorithm and the sharding functions along with some timeout configurations and the 3 replicas we have. Apply the configmap as follows:
kubectl create configmap --from-file=twem-config.yml
The twemproxy deployment is as follows twemproxy.yml
apiVersion: apps/v1
kind: Deployment
metadata:
  name: shared-twemproxy
spec:
  replicas: 3
  selector:
    matchLabels:
      app: shared-twemproxy
  template:
    metadata:
      labels:
        app: shared-twemproxy
    spec:
      containers:
      - name: shared-twemproxy
        image: tarantool/twemproxy
        command:
          - nutcracker
          - -c
          - /etc/config/twem-config.yml
          - -v
          - "7"
        volumeMounts:
         - name: config-volume
           mountPath: /etc/config
        resources:
          limits:
            memory: "250Mi"
            cpu: "500m"
      volumes:
        - name: config-volume
          configMap:
            name: twem-config
---
apiVersion: v1
kind: Service
metadata:
  name: memcache-proxy
spec:
  selector:
    app: shared-twemproxy
  ports:
  - port: 11211
    targetPort: 11211
And Apply using
kubectl create -f twemproxy.yml
Let's break everything up. This file is a deployment and a service bundled up in one file together, The deployment has 3 replicas of twemproxy they take the configmap we created above and run the command nutcracker providing it with the config file & the logger level (set it to 7 just for experimenting) The service then is called memcache-proxy and runs on port 11211.
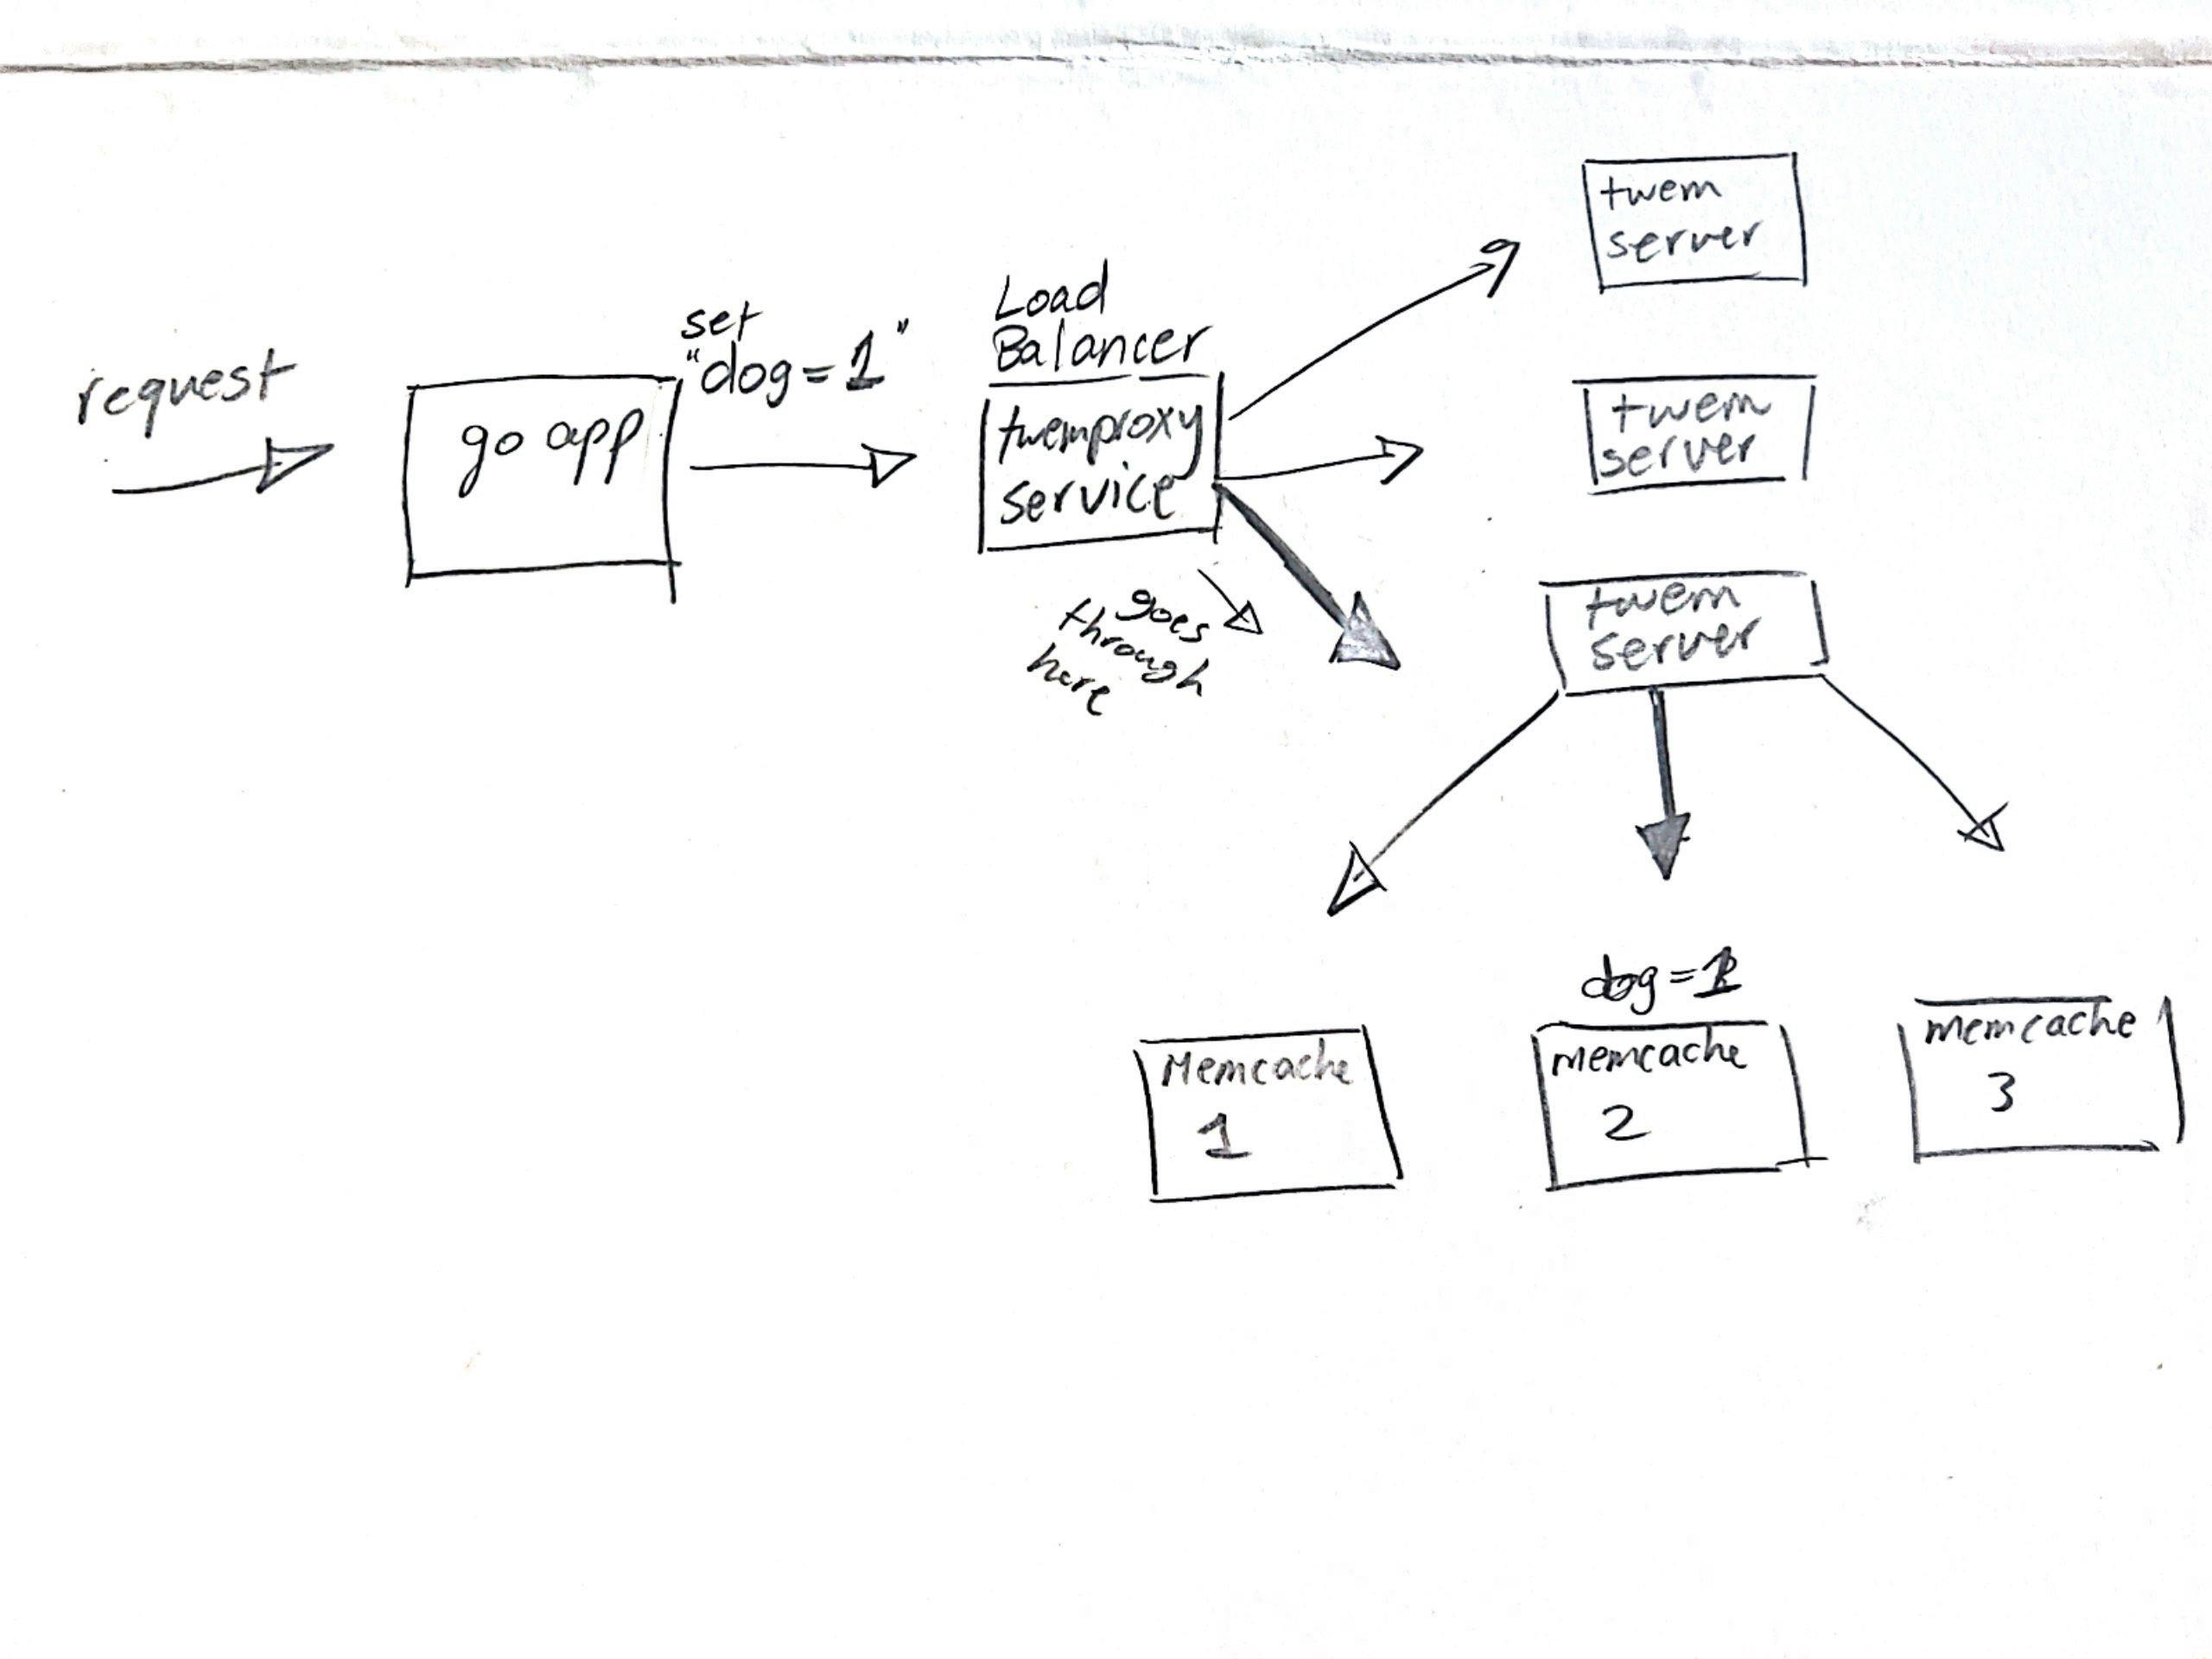
Summary The go app when it wants to connect to a cache sends a request to the twemproxy service which then sends the request to one of the replicas we made. After that the twemproxy server does the hashing on the request and routes it to it's supposed memcache shard. It can be seen as the image below:
All you have to do to use it if you followed everything correctly.
curl -X GET "http://localhost:3000/memcache?lookup=cat"
The first time it will be cache missed but added to cache and after that it will always return the value from the shard in the cache. first response example
GET cacherr errmemcache: cache missadded to cache
After that
VALUEvalue
I saved the value of the lookup key to be the word 'value'
Summary
Distributed systems is one of the most versatile topics out there, you can shape up an app in lots of different ways and it all depends on your needs, for example adding availability to this cache can be done by replicating each shard alone so instead of connecting to a Kubernetes pod we connect to a service that serves pod replicas and so on. Unlimited ideas can come to mind sometimes but as I said everything depends on your requirements and if even distributing your system is worth the hassle. I hope this article gave you an insight of how everything works together and till the next one!